Sat Aug 31 23:54:22 2019
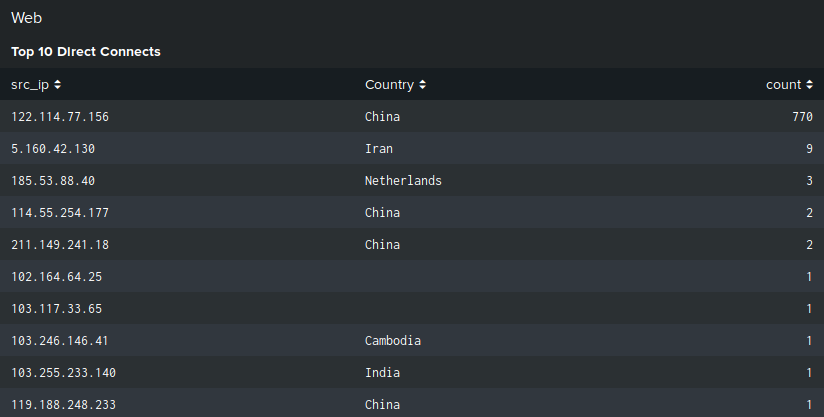
Running a publicly accessible web server is nearly like running a honeypot. Within minutes to hours of the server coming online, it will begin receiving hits from script kiddies looking for an easy pop. Its a ton of fun to pull in the attack data and begin building dashboards showing IPs, URIs, 2, 4, and 500 status codes, etc.
Eventually the real data becomes more important, the actual people that are looking at your pages. bitjammin.com is proxied with Cloudflare. For a long time web ports 80 and 443 were open to the Internet and were constantly under attack.

 Cloudflare publishes IPv4 and IPv6 address lists. Using the IP lists, its possible to define whitelists in your webserver (nginx, apache, etc) or even at the kernel level with
 iptables. Both configurations are not necessary, but you may want one over the other.
- nginx Configuration
- iptables Configuration
nginx Configuration
Allow List
The allow list is simply allow statements followed by the IPv4 and IPv6 addresses Cloudflare specifies. The last statement of the file must be deny all;. Check out the nginx documentation for the details.
allow 173.245.48.0/20;
allow ...;
allow 2c0f:f248::/32;
deny all;
Server Block include
In the server block of your site config, specfiy an include to the allow list.
server {
    include /etc/nginx/cloudflare-ips.conf;
...
}
Reload nginx to have the allow list take effect:
# systemctl nginx reload
iptables Configuration
iptables has separate methods of invoking rules for IPv4 and IPv6. The commands are iptables and ip6tables respectively.
IPv4
Once you start using iptables you will need to consider all the inbound access you require to maintain your boxes; ssh for example. Rules allowing inbound SSH and Cloudflare IPv4 addresses to ports 80 and 443 looks like:
# cat /etc/iptables/ipv4
*filter
:INPUT ACCEPT [0:0]
:FORWARD ACCEPT [0:0]
:OUTPUT ACCEPT [193:26573]

-A INPUT -i lo -j ACCEPT
-A INPUT -m conntrack --ctstate RELATED,ESTABLISHED -j ACCEPT
-A INPUT -p tcp -m state --state NEW,RELATED,ESTABLISHED -m tcp --dport 22 -j ACCEPT
-A INPUT -s 173.245.48.0/20 -p tcp -m multiport --dports 80,443 -j ACCEPT
-A INPUT -s 103.21.244.0/22 -p tcp -m multiport --dports 80,443 -j ACCEPT
-A INPUT -s 103.22.200.0/22 -p tcp -m multiport --dports 80,443 -j ACCEPT
-A INPUT -s 103.31.4.0/22 -p tcp -m multiport --dports 80,443 -j ACCEPT
-A INPUT -s 141.101.64.0/18 -p tcp -m multiport --dports 80,443 -j ACCEPT
-A INPUT -s 108.162.192.0/18 -p tcp -m multiport --dports 80,443 -j ACCEPT
-A INPUT -s 190.93.240.0/20 -p tcp -m multiport --dports 80,443 -j ACCEPT
-A INPUT -s 188.114.96.0/20 -p tcp -m multiport --dports 80,443 -j ACCEPT
-A INPUT -s 197.234.240.0/22 -p tcp -m multiport --dports 80,443 -j ACCEPT
-A INPUT -s 198.41.128.0/17 -p tcp -m multiport --dports 80,443 -j ACCEPT
-A INPUT -s 162.158.0.0/15 -p tcp -m multiport --dports 80,443 -j ACCEPT
-A INPUT -s 104.16.0.0/12 -p tcp -m multiport --dports 80,443 -j ACCEPT
-A INPUT -s 172.64.0.0/13 -p tcp -m multiport --dports 80,443 -j ACCEPT
-A INPUT -s 131.0.72.0/22 -p tcp -m multiport --dports 80,443 -j ACCEPT
-A INPUT -j DROP
COMMIT
Load the rules:
# iptables-restore < /etc/iptables/ipv4
IPv6
Keep the IPv6 rules separate from the IPv4 rules:
# cat /etc/iptables/ipv6
*filter
:INPUT ACCEPT [0:0]
:FORWARD ACCEPT [0:0]
:OUTPUT ACCEPT [0:0]

-A INPUT -s 2400:cb00::/32 -p tcp -m multiport --dports 80,443 -j ACCEPT
-A INPUT -s 2606:4700::/32 -p tcp -m multiport --dports 80,443 -j ACCEPT
-A INPUT -s 2803:f800::/32 -p tcp -m multiport --dports 80,443 -j ACCEPT
-A INPUT -s 2405:b500::/32 -p tcp -m multiport --dports 80,443 -j ACCEPT
-A INPUT -s 2405:8100::/32 -p tcp -m multiport --dports 80,443 -j ACCEPT
-A INPUT -s 2a06:98c0::/29 -p tcp -m multiport --dports 80,443 -j ACCEPT
-A INPUT -s 2c0f:f248::/32 -p tcp -m multiport --dports 80,443 -j ACCEPT
-A INPUT -s 2400:cb00::/32 -p tcp -m multiport --dports 80,443 -j ACCEPT
-A INPUT -s 2405:8100::/32 -p tcp -m multiport --dports 80,443 -j ACCEPT
-A INPUT -s 2405:b500::/32 -p tcp -m multiport --dports 80,443 -j ACCEPT
-A INPUT -s 2606:4700::/32 -p tcp -m multiport --dports 80,443 -j ACCEPT
-A INPUT -s 2803:f800::/32 -p tcp -m multiport --dports 80,443 -j ACCEPT
-A INPUT -s 2c0f:f248::/32 -p tcp -m multiport --dports 80,443 -j ACCEPT
-A INPUT -s 2a06:98c0::/29 -p tcp -m multiport --dports 80,443 -j ACCEPT
-A INPUT -j DROP
COMMIT
Load the rules with:
# ip6tables-restore < /etc/iptables/ivp6
Persistence with systemd
When reboots are performed, it should be expected the iptables rules stick around. Creating an iptables unit file with system calling iptables-reload, rules can persist.
In /lib/systemd/system/, create a new unit file called iptables.service:
# cat /lib/systemd/system/iptables.service
[Unit]
Description=iptables
After=network.target

[Service]
ExecStart=/usr/local/sbin/restore-iptables

[Install]
WantedBy=multi-user.target
Notice the [Service] section, where the restore-iptables script is called. It simply calles the IPv4/6 iptables-restore commands. Be sure to chmod 0750 this file to be executable.
# cat /usr/local/sbin/restore-iptables
#!/bin/bash
iptables-restore < /etc/iptables/ipv4;
ip6tables-restore < /etc/iptables/ipv6;
To have this unit file recognized, reload systemd:
# systemctl daemon-reload
Enable the service to come up at boot:
# systemctl enable iptables.service
Start the service:
# systemctl start iptables
@nullanvoid